
Light Gallery is a plugin for a website created by Sachin N on Github. To function in my opinion is almost the same as the Lightbox that already exists in Blogger, but with better features. Like responsive support, image gallery that can be shifted, a more attractive display, buttons to download images and fullscreen buttons, smoother transitions, and other advantages that the standard Blogger Lightbox doesn't have.
To add it to your blog, please follow the How to Add Light Gallery to the following Blog Themes
How to Add Light Gallery to Blog Themes
Before adding Light Gallery you should disable the standard Blogger Lightbox in Settings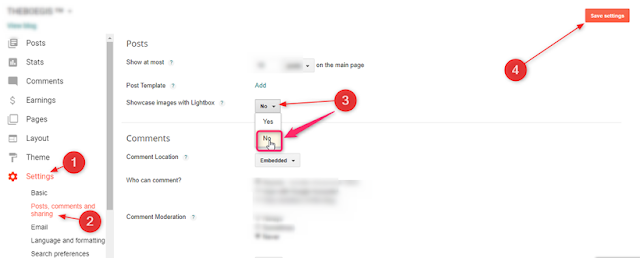
<script src='https://cdn.rawgit.com/Arlina-Design/FlamingTree/c5d422c5/lightgallery.js'/>
<link href='https://cdn.jsdelivr.net/lightgallery/1.3.9/css/lightgallery.css' rel='stylesheet'/>
<script type='text/javascript'>
//<![CDATA[
$('#animated-thumbnail').lightGallery({thumbnail:true,getCaptionFromTitleOrAlt:true,selector:"a[imageanchor]"});
//]]>
</script><script src='https://cdn.rawgit.com/Arlina-Design/FlamingTree/c5d422c5/lightgallery.js'/>
<link href='https://cdn.jsdelivr.net/lightgallery/1.3.9/css/lightgallery.css' rel='stylesheet'/>
<script type='text/javascript'>
//<![CDATA[
$('#animated-thumbnail').lightGallery({thumbnail:true,getCaptionFromTitleOrAlt:true,selector:"a[style]"});
//]]>
</script>Then look for post-body like this
<div class='post-body entry-content' expr:id='"post-body-" + data:post.id'>Change with this code
<div class='post-body entry-content' id='animated-thumbnail' itemprop='articleBody'>Results
Responsive Results
Code From Arlina Design
Post a Comment